Monday, October 25, 2010

At Least It's Progress!

So we have, for a few weeks, been working on our Halloween prep. As you know, Halloween is our favorite holiday and really, the only one we do much for (at Christmas I do put up a tree and some icicle lights over the garage, but that's about it).

Last year we had a few tombstones in our front yard and a fog machine blowing fog over them. Unfortunately, it was just one of those cheap 400 watt fog machines (only about 1500 cubic feet per minute or cfu), and the tiniest breeze would come along and it would all just blow away. Boring.

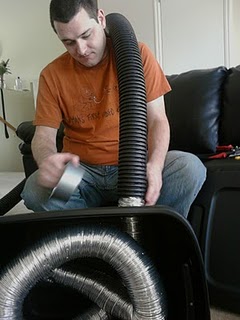
So this year we decided to try something more. When the fog comes out of the machine it is pretty warm so it floats upward automatically. If you want it to creep along the ground, it needs to be cooled. There are fog machines with built-in coolers, but they're way more expensive, so we decided to go to Home Depot (surprise, surprise) and make one ourselves. First up we got a bin (black so it wouldn't show well at night) and some dryer ducting, and coiled the ducting up inside the bin.


Then we cut a hole on the left side and the front side (look at the picture below) and attached the ducting with duct tape. Then the fogger went into one end and the fog came out the other side.


Then, we took an irrigation tube and attached that to the "out" end of the ducting.


When the fogger was hooked up, the fog came out all the little holes in the irrigation tube and, theoretically, would spread out all over the graveyard and not just in one direction.


We took it outside to give it a little test run. Into the bin we put ice (about four bags, I think):


We made sure all the ducting was completely covered:


Then we got everything assembled and let it cool for a while before we turned it on:


We turned it on and we were so excited to see it work...and it barely seeped out over the grass. There just wasn't enough fog coming out of the holes in the irrigation tube. I took a picture but Blogger just deleted it and I'm at work so I don't have a copy. Sad. Anyway, let's just say it wasn't exactly awe-inspiring.
We tried to rectify the situation by widening the holes, and that actually helped quite a bit, but it still wasn't that much fog, so we had to brainstorm. The nice thing was that the chilling mechanism was actually working great; the fog was staying low to the ground

So we decided to buy a more powerful fogger. Two, actually: one for each end of our brilliant apparatus (the other end of the irrigation tube was easy to open up) (we had capped it). So I went around town and looked for a 700 watt machine, which is the next step up. Last year Target had them, but this year they didn't. I went to Wal-Mart, Shopko, K-Mart, and even the Halloween Spirit store in the mall, but no luck. So I got online and started looking. I found several sites that had them for about $40, but the shipping was RIDICULOUS. Like, as expensive as the machines themselves kind of ridiculous. So, I was just going to give up when my dear Scott convinced me that since Halloween was our favorite holiday, and we keep good care of our stuff, and it would last for years and years, we should just buy one really freaking awesome fog machine and use it. So I got online, and Best Buy had a fogger that is 1200 watts (!), and the output was 7000 cfm (four times as much as our little baby foggers) and it was $150 with free shipping (but only $6 if we wanted it rushed) (and of course we did) (it'll be here by tomorrow at the latest).
Tune in next time (or maybe the time after that; I have other things to post about) for a story about how we built a coffin in our front yard!

Thursday, October 21, 2010

Three Layers? Really?!

These pictures are somewhat out of order. Just a few more little things about our ongoing kitchen renovation.

When we pulled up the linoleum to replace that section of subfloor a few weeks ago, we had found a bit of water damage. In order to make sure we didn't have any water damage anywhere else in the kitchen, we pulled up the rest of the linoleum and took a peek behind and under cabinets and appliances.

We found this:


It looks pretty bad, yes?
Well, it wasn't! It turned out to be just a surface stain, so we didn't have to replace any more subfloor. I call that a win!
When we pulled out the hood over the stove we were surprised to find it wired into the wall instead of plugged into an outlet, but the most surprising part was that instead of cutting a nice hole in the drywall, they had just knocked a little hole in the wall and yanked the wires out:


We continue to realize that our house was built by Special People.
Here's Scott attaching corner bead (I told you these were out of order...):


And here's the back door, looking more and more like a door instead of just a hole in the house where we stuffed a door. This has since been mudded over and the boys are, in fact, almost done so I can jump in and start painting:


And a picture of the pulling up of the linoleum:


They had put a new layer of linoleum over the old one, and in a few places we actually found a third layer of linoleum... Oh well, it's all gone now. We just have subfloor now, so we pulled a few carpet scraps we had lying around in the basement and spread them over the kitchen floor so we wouldn't be walking on bare wood.
Oh, and P.S. We ordered the countertops, and we were lucky that we went in when we did because they had a special: free edging upgrade, so we saved about $500!

Sunday, October 10, 2010

Sunday Spackling!

So Sunday (October 3)we picked up where we left off. The floor was done (where we needed it to be; we still need to pull up the rest of the linoleum but that can wait) so we needed to build the new half-wall, do the electrical wiring, drywall, and mud.

Our kitchen was already messy just from moving things out of the way so we could pull sub floor up, but it was only going to get messier.


We needed to pull out some of the cabinets so we could patch some holes in the drywall and move electrical outlets.


Here's the beginning of the new wall (which, funnily enough, ended up only a few inches from where the old wall was...) (but we still would have had to demo the old wall anyway to get it to the right height and get the electrical stuff in the right places).


Scott did all the wiring himself, saving us hundreds of dollars compared to having an electrician do it. Scott never ceases to amaze me with the amount of things he can do around the house!

We started drywalling over the old back door:


Screwing dry wall on to the new wall:


The ceremonial last piece of drywall (well, on the new wall, anyway):


Putting on the first layer of mud:

Here's the end product (well, not really end, but the end for Sunday):


We got a ton more done on Sunday than we did on Saturday. Saturday everything just seemed to get messed up a bit here and there, and it made everything SO. SLOW. But Sunday we had only planned on building the wall and getting the electrical outlets wired. We didn't plan to get drywall and mud done, but we did and it is starting to look AMAZING!

My kitchen is going to be fabulous.

Friday, October 8, 2010

Subfloor Saturday!

This past weekend we got a lot of work done in the kitchen in preparation for the new cabinets that will arrive next month. Now you get to see the pictures!


This is the section of floor where the pantry closet used to be.


There was an air return in the other side of the wall behind it, and there are several holes where electrical wires had been threaded. When we put the new flooring down we are going to need as perfect a sub floor as we can get, so we decided to replace a section of it. It's a good thing, too, because there was a bit of water damage we didn't even know about!


The first step was to rip up the old linoleum (yuck!) and what do you know, there was more, even uglier linoleum underneath it!


After that we started pulling up sub floor. When we're ripping the guts out of this house, we always come across something weird the builders did that makes us think they didn't get it inspected...here's Scott, with an incredulous look on his face because OH LOOK, THEY USED PEGBOARD INSTEAD OF SUB FLOOR. Idiots.


Once we got the giant hole torn out of our floor (and Scott was being goofy and stuck his head up through from the basement), we were able to start putting in new sub floor.


Scott is enjoying a well-needed break


And, tada, the finished sub floor:


The end. Well, not really. But that's all we got done on Saturday.


And by we I mean Scott and Jon. I wasn't very useful most of the time.

Monday, October 4, 2010

Stress Relief

So... Friday was a really stressful end to a really stressful week. So, to blow off some steam my friend Jon and I went shooting. We went up Farmington canyon... it was LOTS of fun. Took us almost 40 mins to get to the top. When we got there we started shooting. I just unloaded a bunch from my Walther P22: it is fun to shoot and is very accurate for a pistol. I then shot my Ruger 10/22. The sight was a little messed up and I didn't have much of a shooting platform... (Tail Gate) so at about 100 feet I was missing a little. I will have to go again and bring a mat to go prone on. Then I busted out my 870 shotgun. I am a lot better shot with my shotgun than I was when I first got it. I hit all but 3 of the 20 clays I shot at when I normally would have only hit 3 of 20 before.

We have an on-call phone at my work... it is nicknamed the "Brick of Burden". We got a new one ... so ... naturally my first thought was to shoot the old one.  I took it with me up in the mountains. I broke it.